Writing A Data Connector
This data connector is based on AssemblyScript.
Writing a Data connector
If you wish to use any sort of external data in a job or app, you will need a data connector.
The Goal
In this example, we will set up a data connector that returns the data fetched from the Uniswap V3 Subgraph and convert it into candles.
Data Connectors need to be deterministic for proper consensus to occur. There is no specified date on this API call, but the data is updated with each meeting of the FOMC which is infrequent (over a month). Updates in close proximity to execution could cause problems.
Getting Started
To get started we will use the AssemblyScript template repository which is available on Github. This repository contains a template for the data connector which can be used to fetch swaps from the Uniswapv3 subgraph, and convert the swaps into candle data. This connector could be edited for most types of GraphQL calls or used for making candles from another dataset.
Project Structure
Data Connectors have 3 functions that will be directly called by the Keeper nodes during runtime. These functions are necessary along with configuration form function, other helper functions and classes will likely be helpful. For more information please see the V2 Data Connector Interface. However, this design means that developers only need to implement the methods that are required for the data connector to work.
Below are the significant files and folders which you will want to get familiar with:
├── assembly      // Source code for the data connector
├── build         // Output of the build process aka `yarn asbuild`
├── coverage      // Coverage report for testing
├── tests         // Test files with a built in test runner
├── asconfig.json // Assemblyscript config
├── package.json  // Dependencies for the data connector
Project Setup
First, clone the Data Connector Template
git clone https://github.com/SteerProtocol/data-connector-template-assemblyscript
Then, switch to the v2-example branch
git checkout v2-example
Lastly, install the dependencies with Yarn
yarn install
Once you have set up your project, you can begin defining your data connector.
Setup Data Connector Params
If you are not familiar with JSON Schema the following guide is very helpful: JSON Schema Guide
For our goals, we will only require the number of months in the past to pull data for. The object limit for a single page of data is 100, and since we are targeting treasury bills, notes, and bonds, we will impose a max of 33 months. We could paginate to get even more data, but this should suffice for our goal. We add a numMonths parameter to our input config.
You can find an online JSON Schema builder with examples here: Online JSON Schema Builder
At the bottom of the template, you will find the config which we will update with our own configuration form.
export function config(): string {
  return `{
    "title": "Uniswapv3 Interfacing Candles Config",
    "description": "Input config for converting swap data from a Uniswap v3 compatable pool into OHLC data",
    "type": "object",
    "required": [
      "candleWidth",
      "poolAddress",
      "lookback",
      "subgraphEndpoint"
    ],
    "properties": {
      "poolAddress": {
        "type": "string",
        "title": "Pool Address",
        "description": "Address of the pool to pull swaps from on the given subgraph",
        "detailedDescription": "i.e. '0x50eaEDB835021E4A108B7290636d62E9765cc6d7'"
      },
      "lookback": {
        "type": "integer",
        "title": "Lookback",
        "description": "Duration in seconds of how far back in time from the current time to pull data (a value of 60 would pull the last 60 seconds of data)",
        "detailedDescription": "For example: If you want to fetch the past 14 days of candles with day candles, you would put the duration of time in seconds (14 days * 24 hours in day * 60 minutes in hour * 60 seconds in minute = 1209600)"
      },
      "candleWidth": {
        "type": "string",
        "title": "Candle Width",
        "description": "The size or width of each candle in mhdw format (a value of '15m' will make each candle size 15 minutes wide)",
        "detailedDescription": "Examples: 1m, 5m, 15m, 1h, 1d, 1w"
      },
      "subgraphEndpoint" : {
        "type": "string",
        "title": "Subgraph Endpoint",
        "description": "The Graph API endpoint that indexes the desired pool on the desired chain for this data connector",
        "detailedDescription": "Examples: 'https://api.thegraph.com/subgraphs/name/ianlapham/uniswap-v3-polygon'"
      }
    }
  }`;
}
Once you have defined your config, any parameters must be initialized with the initialize function. The predetermined timestamp will also be passed to be used in any calls requiring time-specific information.
@serializable
class Config {
  subgraphEndpoint: string = "";
  poolAddress: string = "";
  candleWidth: string = "";
  lookback: u32 = 0;
  executionContext: ExecutionContext | null = null;
  isValid(): boolean {
    if (!this.subgraphEndpoint) return false;
    if (!this.poolAddress) return false;
    if (!this.candleWidth) return false;
    if (!this.lookback) return false;
    if (!this.executionContext) return false;
    if (!this.executionContext!.epochTimestamp) return false;
    return true;
  }
}

let configObj: Config | null = null;
const swaps: Swap[] = [];

export function initialize(config: string): void {
  configObj = JSON.parse<Config>(config);
  if (!configObj!.isValid()) throw new Error("Config not properly formatted");
}
Request & Response Logic Implementation
Now that we have all instance specific parameters we need, the node will call our execute function. The execute is called without any parameters and all the logic happens internally, rather than externally via FFI (as with V1). The fetchSync() function is called which pauses the thread until the data is fetched and resumes it, for a synchronous function call.
The custom Swap Parser is implemented as an alternative to as-json just because its curated to parse Swap data from TheGraph. Otherwise, using JSON is reccomended unless another serialization format is used. Overall, the synchronous fetching provides a more coherent DX across the board and the addition of CCXT (See an example of a CCXT-enabled data connector Here)
V2 Data Connectors are required to be built with Asyncify if utilizing Fetch or CCXT calls.
export function execute(): void {
  if (!configObj) throw new Error("Missing config: Must call config() first!");
  let currentTimestamp = <u32>configObj!.executionContext!.epochTimestamp - configObj!.lookback;

  while (true) {
    const res = fetchSync(configObj!.subgraphEndpoint, {
      method: "POST",
      mode: "no-cors",
      headers: [
        ["Content-Type", "application/json"]
      ],
      body: String.UTF8.encode(
        `{"query":"{ swaps (first: 500, skip: 0, where: {timestamp_gt: ${currentTimestamp}, timestamp_lt: ${configObj!.executionContext!.epochTimestamp}, pool: \\"${configObj!.poolAddress.toLowerCase()}\\"}, orderBy: timestamp, orderDirection: asc){id, timestamp, amount0, amount1, transaction {id, blockNumber}, tick, sqrtPriceX96}}"}`
      )
    });

    const swapText = res.text();
    if (!res.ok) break;

    if (swapText.length <= '{"data":{"swaps":[]}}'.length) break;

    new SwapParser(swapText).parseTo<Swap>(swaps);
    currentTimestamp = u32.parse(swaps[swaps.length - 1].timestamp);
  }
}
Transform
With the conclusion of the execute callback loop, the Keeper node will call transform which returns the data in its final shape for the execution bundle. In our case, all calls will return 100 objects of our selected securities. Since we have a desired number of months, we simply splice our ordered data (already sorted by date from the api) and make our final payload.
We also make a helper function to extract the interest rate from the object.
export function transform(): string {
  const X192 = Math.pow(2, 192);

  const rawTradeData: Array<RawTradeData> = [];

  for (let i = 0; i < swaps.length; i++) {
    const swap = swaps[i];
    const sqrtPriceX96 = f64.parse(swap.sqrtPriceX96)
    rawTradeData.push(new RawTradeData(i32.parse(swap.timestamp), (sqrtPriceX96 * sqrtPriceX96) / X192, f64.parse(swap.amount0)))
  }

  const candles = generateCandles(JSON.stringify<Array<RawTradeData>>(rawTradeData), configObj!.candleWidth);
  return candles;
}
Running
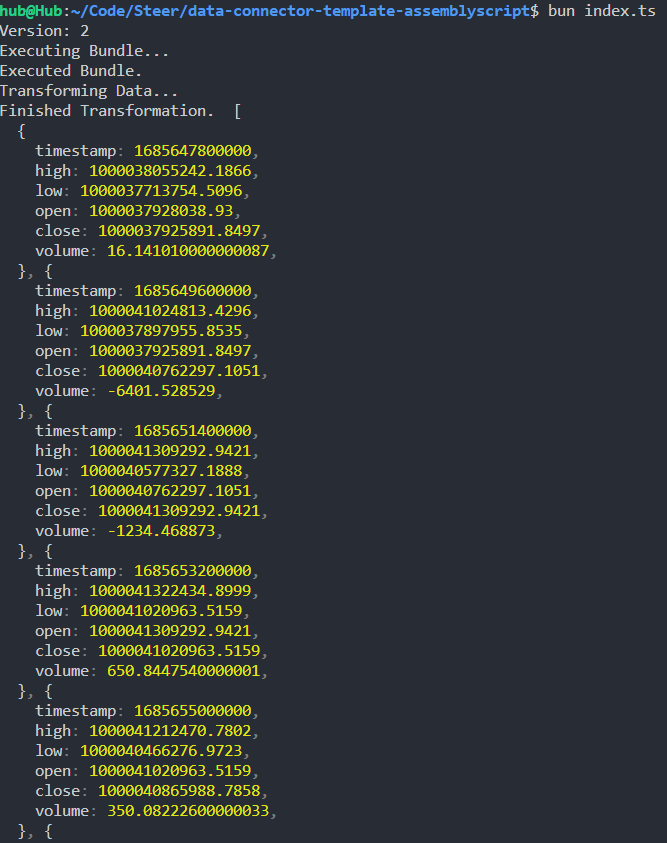
To run the Data Connector, first build the .wasm files and then execute index.js or index.ts in the base directory
yarn build:debug
node index.js
You should see the following output:
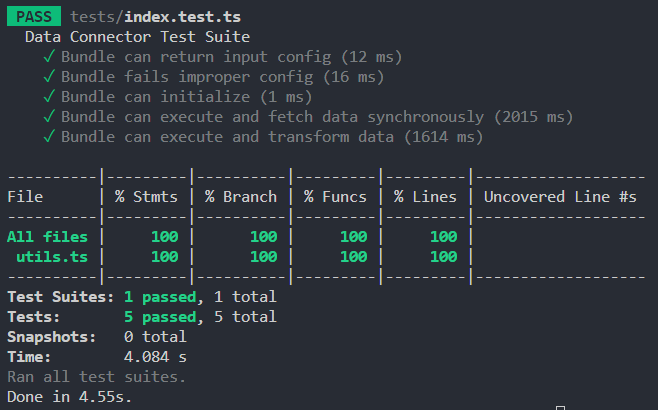
Testing
The template comes with a number of tests simulating the various calls from the node and the front end fetching the config form. There are tests for validating the config, the first call of execute, the nth call of execute, the last call of execute, and finally the transformation. You may need less or more tests depending on your data connector.
Let's make sure the test can run by using the following command:
yarn test
You should see the following output:
Final Result
As you can see, it is very quick to create a simple data connector for the Steer Protocol! By having custom parameters and calling through the synchronous Fetch API, we are able to have a flexible platform for fetching data. Transforming the data can shape things as needed to be consumed by an app or execution bundle. In the end, the decentralized and deterministic fetching of data provides a fast and secure way of bringing information on-chain.
Next Steps
Use the Steer Protocol Backtesting Platform to test your app!
Steer provides a state-of-the-art backtesting platform for all concentrated liquidity apps! Run your execution bundle on historical data and see how it would have performed! Examine risks and debug your app to improve its performance. You can find more information about this tool in the Steer Backtesting Documentation.