Liquid Staking Strategy
The LST Strategy is still in its earlier live phases where we are fine tuning and exploring what works best in live markets.
The Liquid Staking Token Strategy is the first hybrid market making and trading type strategy of Steer
Ideal Applications
Any asset pairing where there is gradual expected rate of appreciation between the assets can be suitable for this strategy.
Liquidity Strategy Configuration Parameters
This section explains the configuration parameters for the LST/LRT strategy. These parameters allow you to customize the strategy's behavior to suit your specific needs and market conditions.
Position Size
- Type: Integer
- Description: This parameter determines the size of the liquidity positions created by the strategy. It represents the tick range for each position.
- Usage: A larger position size will create wider liquidity ranges, which can capture more fees but may be less capital efficient. A smaller position size creates narrower ranges, which can be more capital efficient but may need to be adjusted more frequently. This parameter may want to be considered in the context of how fast the appreciation rate is expected to be and how often the strategy will execute.
Token Zero Appreciating
- Type: Boolean
- Description: This parameter indicates whether the token in the '0' position of the pair is expected to appreciate over time relative to the other token.
- Usage: Set to
trueif you expect token0 to gain value compared to token1 over time, andfalseotherwise. This affects how the strategy positions liquidity. - Example: For a WETH/WstETH pair where WETH is token0, set this to
falsesince WstETH is the appreciating asset relative to WETH.
Ideal Ratio
- Type: Number
- Description: This represents the ideal value ratio between token0 and token1 in the pool.
- Usage: Express this as token0/token1. The strategy will try to maintain this ratio when creating liquidity positions. In most cases this value will be 1 for an even split of asset holdings, however the strategy will try to accumulate the appreciating asset.
Acceptable Ratio Magnitude
- Type: Number
- Description: This parameter defines how much deviation from the ideal ratio is acceptable before the strategy starts to adjust positions more aggressively.
- Usage: Express this as a multiplier. The strategy will start creating more extreme positions when the current ratio is outside the range [ideal ratio / magnitude, ideal ratio * magnitude].
- Example: If set to 1.1, the strategy will allow roughly a 10% change in the ratio before making more aggressive adjustments.
Fixed Width
- Type: Integer
- Description: This parameter sets a fixed width for the "tail" or extended positions when the asset ratio is outside the acceptable range.
- Usage: Like the Position Size, this is expressed in ticks. It determines how far the strategy will extend positions when trying to rebalance the pool. This value should be larger than the position size, and large enough to not have the price move through it before any sort of price reversion occurs that the strategy can take advantage of.
Considerations for Parameter Selection
Market Volatility: In more volatile asset pairings or pairs with faster or uncertain appreciation, you might want to use larger position sizes and fixed widths to capture price movements.
Trading Fees: Higher position sizes can capture more fees in high-volume pools, but may be less capital efficient.
Rebalancing Frequency: Tighter parameters (smaller position sizes, lower acceptable ratio magnitude) may require more frequent rebalancing but can be more capital efficient.
Gas Costs: More frequent rebalancing can incur higher gas costs. Consider this when setting parameters, especially for lower-value pools.
Long-term Trends: The 'Token Zero Appreciating' parameter should reflect your long-term view on the token pair. There will always be underlying risk with LSTs or LRTs that the underlying mechanisms fail.
Remember, these parameters work together to define the strategy's behavior. It's often beneficial to backtest different configurations to find the optimal settings for your specific use case and market conditions.
Technical Logic Flow
This strategy manages liquidity positions based on the current tick, peg tick, asset ratio, and whether token0 is appreciating. Here's a breakdown of the main decision points and states:
1. Initial Checks
- Calculate the current asset ratio (amount0In1 / amount1)
- Determine ideal weights based on the configured ideal ratio
- Calculate default position widths based on current holdings
2. Main Decision Tree
2.1 Peg is close to current tick (within 2 * tickSpacing)
- If asset ratio is within acceptable range:
- Create a single position around the current tick
- If asset ratio is outside acceptable range:
- For token0 appreciating:
- If too much token1: Create positions left of current tick
- If too much token0: Create positions right of current tick
- For token1 appreciating:
- If too much token1: Create positions left of current tick
- If too much token0: Create positions right of current tick
- For token0 appreciating:
2.2 Peg is higher than current tick
- If asset ratio is within acceptable range:
- Create positions between current tick and peg
- If asset ratio is outside acceptable range:
- For token0 appreciating:
- If too much token1: Create positions left of current tick, extending to peg
- If too much token0: Create positions right of current tick, extending past peg
- For token1 appreciating:
- If too much token1: Create positions left of current tick, up to peg
- If too much token0: Create positions right of current tick, extending to peg
- For token0 appreciating:
2.3 Peg is lower than current tick
- If asset ratio is within acceptable range:
- For token0 appreciating: Create positions from peg to current tick and above
- For token1 appreciating: Create positions from below peg to above current tick
- If asset ratio is outside acceptable range:
- For token0 appreciating:
- If too much token1: Create positions from peg to current tick
- If too much token0: Create positions from peg to above current tick
- For token1 appreciating:
- If too much token1: Create positions from below peg to current tick
- If too much token0: Create positions from peg to above current tick
- For token0 appreciating:
3. Position Creation
- For each scenario, the strategy creates one or more Position objects
- Each Position has a start tick, end tick, and weight
- The positions are designed to rebalance the portfolio towards the ideal ratio and peg
4. Execution
- The strategy returns a ULM (Uniswap V3 Liquidity Management) result
- This result includes the new positions and whether to skip the swap (rebalancing) step
Decision Diagram
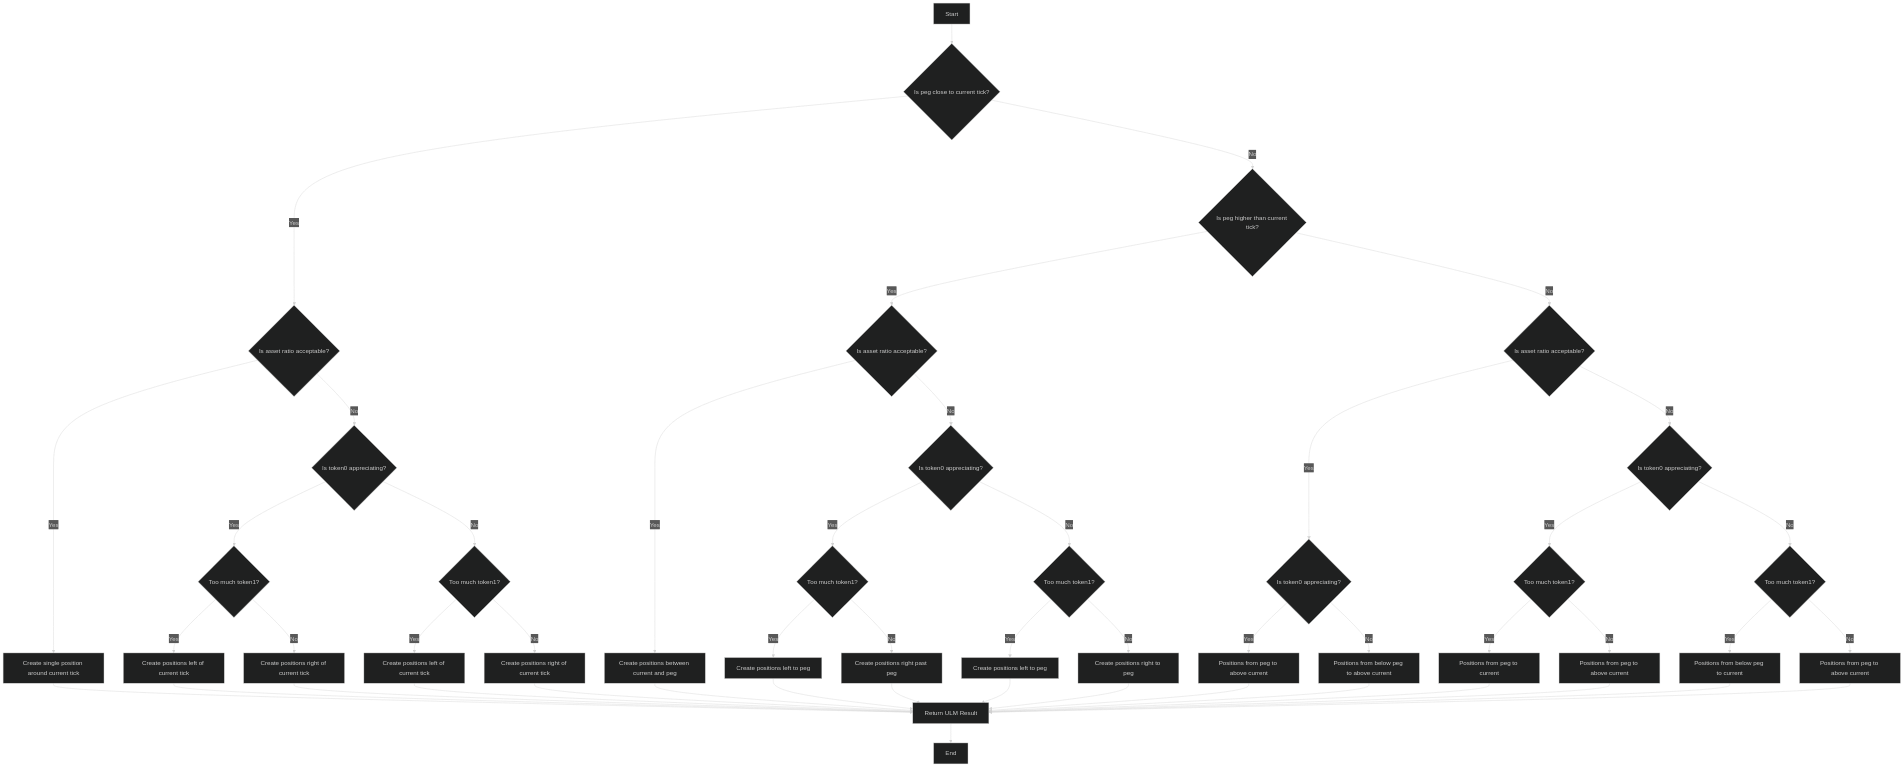
graph TD
    A[Start] --> B{Is peg close to current tick?}
    B -->|Yes| C{Is asset ratio acceptable?}
    B -->|No| D{Is peg higher than current tick?}

    C -->|Yes| E[Create single position around current tick]
    C -->|No| F{Is token0 appreciating?}

    F -->|Yes| G{Too much token1?}
    F -->|No| H{Too much token1?}

    G -->|Yes| I[Create positions left of current tick]
    G -->|No| J[Create positions right of current tick]

    H -->|Yes| K[Create positions left of current tick]
    H -->|No| L[Create positions right of current tick]

    D -->|Yes| M{Is asset ratio acceptable?}
    D -->|No| N{Is asset ratio acceptable?}

    M -->|Yes| O[Create positions between current and peg]
    M -->|No| P{Is token0 appreciating?}

    P -->|Yes| Q{Too much token1?}
    P -->|No| R{Too much token1?}

    Q -->|Yes| S[Create positions left to peg]
    Q -->|No| T[Create positions right past peg]

    R -->|Yes| U[Create positions left to peg]
    R -->|No| V[Create positions right to peg]

    N -->|Yes| W{Is token0 appreciating?}
    N -->|No| X{Is token0 appreciating?}

    W -->|Yes| Y[Positions from peg to above current]
    W -->|No| Z[Positions from below peg to above current]

    X -->|Yes| AA{Too much token1?}
    X -->|No| AB{Too much token1?}

    AA -->|Yes| AC[Positions from peg to current]
    AA -->|No| AD[Positions from peg to above current]

    AB -->|Yes| AE[Positions from below peg to current]
    AB -->|No| AF[Positions from peg to above current]

    E --> AG[Return ULM Result]
    I --> AG
    J --> AG
    K --> AG
    L --> AG
    O --> AG
    S --> AG
    T --> AG
    U --> AG
    V --> AG
    Y --> AG
    Z --> AG
    AC --> AG
    AD --> AG
    AE --> AG
    AF --> AG

    AG --> AH[End]